This weekend, I got to see the power of music shape hearts and minds at the Fifth Annual Highrock Christmas Concert. Spectacular music. Amazing people.
My behind-the-scenes video of the event:
My photographs of the event:
There are 25 posts filed in photosets (this is page 2 of 4).
This weekend, I got to see the power of music shape hearts and minds at the Fifth Annual Highrock Christmas Concert. Spectacular music. Amazing people.
My behind-the-scenes video of the event:
My photographs of the event:
I just got back from a whirlwind trip to Los Angeles. While there, I worked with Stephen Tobolowsky to put the finishing touches on our upcoming live show. I also had the opportunity to photograph Dan Trachtenberg’s wedding.
Dan and I have been friends for a couple years now (he’s guested on the /Filmcast a few times, always to great effect). It was an honor to capture images from his big day with his bride Priscilla, who looked absolutely stunning in her wedding dress. The wedding took place at Marvimon in Los Angeles. Beautiful location, great food, amazing people. I could not have asked for a better wedding to shoot!
Here is a video I put together of the festivities. It is my first attempt at assembling a video slideshow out of my photos. Hope y’all enjoy it:
The Wedding of Dan Trachtenberg and Priscilla Hernandez from David Chen on Vimeo.
Sorry for the sparse updates recently. I’ve spent the last few days moving. It’s not a process I recommend; moving is incredibly disruptive, not just because it requires exceptional amounts of exertion, but because it upsets one’s routine. In a literal way, the world I woke up in yesterday is no longer the one I’ll wake up in today. It’ll take some getting used to. To commemorate the occasion, I tried my hand at some street photography last night in Harvard Square. (Again, I used my Canon 5D Mark 2 on ISO 3200.)
It’s a place that’s full of character. These photos are my brief love letter to it:
After viewing the Strobist Lighting Seminar DVD Box Set, I was particularly intrigued by what photographer David Hobby was able to achieve using a cheap, simple collapsible muslin background created by Botero. I decided to buy Botero Background #023 (the same one in the DVD, apparently) and try to replicate the effects that Hobby created. So, I did a quick-and-dirty setup in my living room, got my roommate Matt to pose for 10 minutes, cranked up my f-stop to minimize ambient light, and fired away. Here are the photos that resulted.
In general, I’m extremely impressed that I was able to achieve this look in my living room, which, trust me, does not resemble a photo studio in the slightest. Here are a few of my notes:
Overall, I’m pleased with the purchase and am glad that with just a $65 item, I have another major asset I can add to my portfolio.
When the White House puts out a photo of President Obama, it’s frequently taken using a Canon 5D Mark II (Example: this iconic image). It’s the same camera that Jerry Ghionis uses. It’s one of the gold standards of DSLR cameras these days, in terms of image quality.
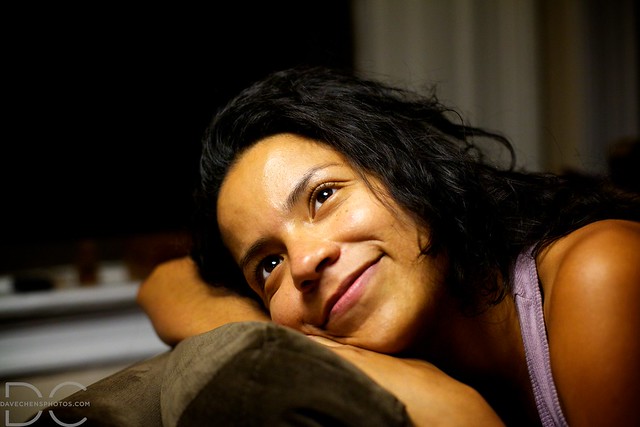
I recently acquired a Canon 5D Mark II after the unit went on sale at Best Buy. There are many reasons to own one, but the two primary ones for me were the fact that it sports a full-frame sensor (allowing me to take full advantage of my EF lenses), and the fact that it gets amazing low light performance.
Last night, I decided to put the latter to the test. I spent some time with my friend Rachell, during which I shot a few photos at ISOs 2500 and 3200:
On the way home, I shot a local band, Cradle to the Grave, who were performing at the Plough & Stars bar in Central Square. All of these photos were shot using ISO 3200 or ISO 4000:

My thoughts? The low light performance is spectacular. It is, in fact, so good that I’m pretty irritated I have not been using this camera all along. With my Canon 7D, I top out at ISO 1600 before the images become unusable, noise-wise, for any professional context. Yet with the 5D Mark II, even the ISO 4000 images are theoretically possible to use (realistically I probably wouldn’t go higher than 3200, but it depends on the situation. We don’t always get to choose our optimal ISO levels). And as you hopefully can see above, this makes possible images that I could only dream of prior to this point.
How many images have I missed out on because I did not have this camera before now? I shudder to think on it. But I’m glad this camera and I are finally together.
[Thanks to Alex Billington for hooking me up with the 50mm f/1.4 lens used in all these images. Extremely handy for producing sharp images in very dark situations!]
I visited San Francisco this past weekend to see some old friends and see about a job opportunity. I was able to bring my Canon 7D with me, along with a 70-200mm f/2.8 lens. In addition, I brought along my trusty Fuji X100 as well. The Fuji is a phenomenal travel camera — small, unassuming, attractive, and likely to spark conversation with those who see you using it:
In addition, I did a brief photo shoot with my friend Sara. We took these photos after viewing the Picasso exhibit at the de Young museum, which, btw, was breathtaking:
Sara is one of those natural beauties, a person whose posing and expressions are so sublime that they rarely needs any direction from me. I hope these photos were able to bring out that beauty.
This is long overdue, but I thought I’d make a brief post about some of my experiences in New Zealand recently. I had the opportunity to visit Weta studios to see footage from Steven Spielberg’s latest film, The Adventures of Tintin. You can find my full write-up by clicking here, as well as a partial transcript of a conversation I participated in with Spielberg and Peter Jackson (part 1 and part 2).
After the set visit, I took the opportunity to drive along the South Island of New Zealand. The rental car cost me about $450 for three days (including gas, which costs about $8/gallon in New Zealand), and I had to drive all by myself for about 1,000 miles, but I saw sights that are so beautiful that they simply can’t be matched anywhere else on earth. For this trip, I used a combination of my Canon 50D with a 50mm f/1.8 lens, my Fuji X100, and my iPhone mostly using the Pano app:
I’ve done nature photography in the past, but in general, I find it to be a challenging enterprise. On a very basic level, the technology is limiting. The human eye’s dynamic range is vastly higher than that of even the most advanced dSLR on the market. Therefore, when you’re photographing images like this one…

…it can be challenging to determine the correct exposure level. And even if I got something usable, some post work would be required (as it was in this image). Fortunately, as I’ve pointed out in the past, the Fuji X100’s dynamic range is spectacular. Obviously HDR is a solution for some of these problems, but I’m still not sure I want my images to look so obviously manipulated.

When you’re photographing a human being, it’s pretty easy to figure out how to compose an image; maybe stick to the rule of thirds, and if you have interesting background elements, use them to frame your subject in a unique way. But with nature photography, you have to be more conscious of how different elements fill the frame, how the eye is drawn to them, and how the eye moves through the image. You also have a lot less flexibility in terms of which angle you are shooting from.

Despite the challenges, I’d like to think I was able to capture a small fraction of the beauty that’s present in New Zealand. Hopefully, you feel the same way.
[A special thanks to Sam and to Sid from New Zealand for their help in allowing me to capture these images!]
Arrived in Wellington, NZ last night after 24 hours of brutalizing travel. Spent the day yesterday trying to stay awake, but I was able to wander around Wellington and try to capture the local flavor through my lens. The following were taken using my Canon 50D and my Fuji X100:
Big thanks to /Filmcast listener Sam for taking me around, and being incredibly patient with me as I got increasingly loopy.